HTML5 Tutorial For Beginners

HTML5, or to give it its full name, Hyper Text Mark-up Language 5 is what is known as a markup language, and it is the latest release of HTML, the language that is used to build websites. Its predecessors are XHTML 1.0 and HTML 4.01.

In this HTML5 tutorial, we’re going to give you a short lesson in how to get started. This article is essentially, coding for beginners, especially those looking to learn how to design basic websites.

HTML5 – The New Kid on the Block

We all know how quickly the Internet has developed (and is continuing to do so), so it’s way past time that a new version of HTML came out to cope with the revolution in multimedia.

For example, HTML5 has been formatted with new video and audio elements in order to make it easier to include these innovations in the websites that you construct. Essentially, this makes the likes of portfolio pages and online stores much more interactive.

 What You’re Going to Need

The two things you will need in order to make a start are the latest versions of the popular browsers such as Google Chrome, and a good Notepad application to use as your text editor.

For the purposes of getting started we’re going to use Notepad++, which is an open source (meaning it’s free to download and use) software. You can also use an HTML5 editor such as Sublime Text 2, which has a free version and a paid.

Basic Terminology

The first thing you need to do is to understand the terminology HTML uses. So for our introductory exercise you will need to be familiar with the terms TAG, ELEMENT, and ATTRIBUTE. However, before you begin with HTML5, it’s really necessary for you to have a basic understanding of HTML and it’s common tags.

TAG

This is how the tern TAG is written: <tag> Basically, it is simply the word “tag” with a left facing angle bracket at the beginning of the word, and a right facing angle bracket at the end.

ELEMENT

This is how an element appears and is constructed:

html5_tutorial

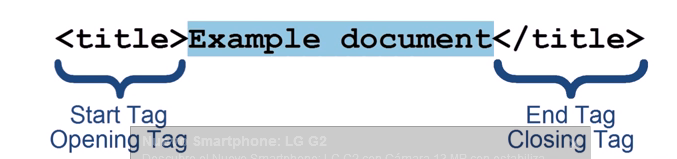
The components of this element are the start or opening tag; the element (in this case “example document”, and an end or closing tag.

The element shown above is a “title element”, as defined by the text within the angled brackets. You’ll note that the End Tag has a forward slash before the word title. This differentiates and defines it as an End Tag as opposed to a Start Tag.

The majority of the elements used in HTML 5 follow the same pattern i.e. a Start Tag and an End Tag with content in between them. There are however some elements that only have a Start Tag.

Take as an example the following:

<br>

This is a line break element. It has no End Tag and its only function is to define where line breaks occur.

ATTRIBUTE

This is the last of the 3 terms that we’re going to be looking at in this short introductory HTML5 article. An Attribute acts in the same way that an adverb enhances a verb.

It attributes additional information about an element, hence the name “Attribute”. Below you can see how an Attribute is constructed. Let’s start with H1 element as depicted below. This element has no attribute.

<h1> Your text here </h1>

Note that all tags generally need to be closed thus: </>, not doing so could mess up the code for an entire page.

But if we wanted to give it an Attribute, it will be constructed as shown below.

<h1 id=”main”> Main Section </h1>

The Attribute itself is the id=”main” HTML5 component. You’ll note that it is always located within the Start Tag part of the Element.

The first part of the Attribute is the “id” and this is the name of the Attribute. The name is them followed by an equal sign, which is then, in turn, followed by the content, “main”, which must always be put within quotation marks.

There are other conventions that HTML5 will allow when construction Attributes, but for the purposes of this “getting started” exercise, this is the one we are using. It will always work.

Putting the Theory into Practice

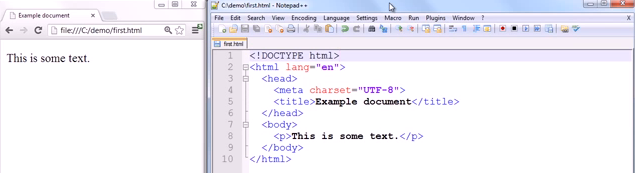
Okay, so now we’ve got to grips with some basics, let’s now see them in action. Take a look at the screenshot below:

Document 1

You’ll note that there are some indents shown in this screenshot. But please note that they are for cosmetic purposes only.

They don’t actually have any impact whatsoever of the layout of the text itself, as you’ll see further below. It’s just that some people find they make the instructions a little easier to read and to follow.

The screenshot above is an HTML5 document. We’re going to use this to put our theory into practice, and to see how it will appear in a browser.

Getting Practical

So to start, open up your Notepad++ and copy the data exactly as shown. Then we need to save it.

  • Just go to File drop down menu in the top left hand corner
  • Click to activate the drop down menu
  • Select save as
  • Save as First.html

If you get the message that you are not allowed to save the file in that location, you can save under documents, the alternative it should give you.

Now we’re going to check out your handiwork.

Still in Notepad++, click on the RUN menu at the top of the page. Select your browser of choice from the drop down menu, and hey presto, your browser should open displaying the document with the text “This is some text”.

To double check it’s not just smoke and mirrors. Take a look at the screenshot below. The one on the left is the browser window, and you can see it is called “first.html”

docuument 2

Live Modification

You can see from the screenshot shown above that text displayed in the browser window on the left-hand side is the same as that shown beneath <body> in the Notepad page on the right.

If we now enter another line of text below the existing line in Notepad, save the revised documents, and then refresh the document shown in the browser page (hopefully still got this open), you’ll see that the second line of text magically appears.

There are a huge amount of tags and other code and even scripts that you can use and a plethora of tutorials, reference guides and books. Whilst it may look a little daunting at first, now you’ve created a simple document, have a play around and add more to it, such as images, paragraphs and so on.

Your document should always include <!DOCTYPE html> and in the <head> section this is where information goes that the search engines look at. Everything in the <body> section is what you will see on the page in the browser and <p> is for new paragraph.

Common tags:

<b> – bold

<i> – italics

<br> – break for new line

Note that HTML, either 5 or otherwise uses American English so you should get accustomed to altering your spelling to suit, for example: color as opposed to colour

For Further Details

For a full explanation of all of the headings etc we typed into the HTML document, you can check out YouTube videos, or visit W3C Schools (the people who decide what the standard for code will be) for a host of reference material and exercises where you can practice coding in real time.

Once you are finished, you’ll be able to learn how to make your own website for free, using Word Press.

List Building – Downloadable Content As An Email Marketing Strategy

Whether you’re an affiliate, running an ecommerce store or offering service, a downloadable content strategy is a great way to entice people to signup to your campaign and a perfect email list building technique.

White papers are one of the simplest forms of downloadable content. While not being the fanciest marketing tools in the world, can be invaluable when written well.

To give you an example, a white paper is a report into, say, a new product or service that you have to offer – such as a new software package – and it goes into to detail about what the product is, what it does and why clients should buy it.

White papers are about educating people and giving highly useful information; they don’t have to relate to a specific product, but it should discuss in detail something that is highly relevant to your industry and give new information to the reader.

They are usually offered for free in a downloadable format, signing up a prospect to an email marketing list in the process! More and more businesses are incorporating this into their content strategy for the web.

Easy. So how do you go about writing a good one?

Show your knowledge

You just have to know your subject and be passionate about it. Remember though, this is an email marketing strategy to aid list building so spend time creating a snappy title that explains what your white paper is all about; it’s all about signups!

Audience

Decide who your audience is and pitch the content accordingly. If you’re hoping to sell to a particularly tech-minded client, then by all means fill the paper with data and specs. But that’s only an approach to take if you’re absolutely sure you won’t be blinding your audience with science. Otherwise, a simpler, jargon-free marketing white paper is the better option.

Approach

Don’t think just because the phrase ‘white paper’ sounds quite serious that you need to write reams and reams of copy – do that, and you run the risk of your clients zoning out before they finish. Only you can decide the right length – it all depends on your product and your client – but there’s really no need to pad your paper out unnecessarily.

However, do bear in mind that the most successful white papers are usually somewhere between 6 and 12 pages long, including sidebars, snippets, a cover page, table of contents, appendix (for sources, although you can also use footnotes) and images.

Entitled

First, a title – something suitably businesslike is in order, communicating what your product is about and how it can help the client. Nothing too cute or hyperbolic here – this isn’t Twitter…

The Solution

Now, a white paper needs to demonstrate that it’s the solution to a problem that your reader may well not even have realised they had. Which is why after a brief outline, you need to devote some time in your white paper to describing what that problem actually is.

Perhaps you’re promoting a super-special new Learning Management System. In that case, talk a little bit about how staff learning needs are constantly changing and older LMSs aren’t necessarily as adaptable as newer ones.

Whatever you’re promoting, simply find what your solution is. Then back up whatever your argument is with market research and plenty of it – if you’ve got stats to prove what you’re saying, it’s much more effective.

Good reports

So what’s the solution? Well, remember you’re writing a report not an out-and-out sales pitch, so don’t immediately say ‘Our product is the answer!’ Make a case for the type of product that you’re selling and explain its benefits. If you’re trying to sell a newer version of a product your client already owns, talk about the need to upgrade and leave old technology behind.

Now you can move on to your own service or product, highlighting its own particular benefits that make yours better than the competition, including a call to action directing people to your website or phone number to get any questions answered. Conclude with a summing up paragraph very briefly describing – again – why your product is so brilliant and how it can solve your clients’ problems.

Getting visual

So that’s the content – what about the looks? Well, a white paper doesn’t need to be stupidly over-designed – no trendy fonts and go easy on the primary colours, please – but it does need to look professional.  Include a title page and a brief abstract to outline what the paper is about.  Be sure you company name, logo and contact details are on this first page somewhere.

 Covers in word

Create a cover page in Word, adding colours and logos to suit

Splitting your text into two or three columns is a good idea – anymore, and you’re at risk of making your lovely white paper look all cramped; not using columns at all will make your lines of copy way too long.

Bear in mind that the use of sidebars and graphics for including snippets of information are ideal for breaking up the text and keeping the reader interested.

Sidebars in word

You can use text boxes to create sidebars and snippets in Word

If you’ve got a lot of charts and graphs, consider putting them all on one page, so that the client can get all that data at a glance, and use pull quotes and subheads to break the copy up.

Get some help

If you don’t own PDF Writer, then don’t panic, there are now a slew of online resources which quickly and easily convert Word docs to PDF for a professional-looking finish.

If you’re really not confident, a quick Google or LinkedIn search for ‘white paper writers’ turns up plenty of freelance guns for hire, all of who claim they can write the perfect white paper for you.

If you’ve already got your email marketing campaign in place thanks to prior list building, check out our post on creating effective email marketing content.

10 Steps – Earn Money From Home With Affiliate Marketing

Job security is something we all worry about every single day; not surprising considering un-employment by 2010 in the US was the lowest since 1990 (source).

The good news?

Your average-Joe (or Jo!) has the tools in-front of them to create small business ideas that help them earn money from home, most of which are free. There are quality online affiliate training programs that you can join for free!

There are also a diverse range of available jobs working from home, not to mention that with great online business ideas & a small budget you could become a millionaire!

A few reasons why affiliate marketers start their career include:

  • Work flexibility
  • Low start-up costs
  • No prior experience needed
  • High income potential
  • Low overheads
  • Home based business

First of all, you need to have the right mindset.

 “Whether you think you can, or you think you can’t, you’re probably right.”- Henry Ford

1. Train

Doing a 2 hour video course explaining the different ways to make money online will not make you a successful affiliate marketer.

The world, including the internet marketing sphere, is constantly changing. You need to know what those changes are and how you can adapt your plan to suit. This means dedicating a few hours per week to catch up on your industry niche, as well as any developments that relate to the marketing tactics you are using.

Action

For affiliate marketers, Affilorama has always been a fantastic resource. There are free accounts available, so simply fill out a quick profile description & picture to get started; you’ll have people helping you from day 1. It’s a great place to start learning how to develop a business.

2. Get Motivated

Jobs working from home, from the outside looking in, look…awesome!

Remember, you don’t have to work. Even when you do, you might not get paid a figure that you were expecting. This can lead to a lack of motivation which can be a real drag!

Action

This post highlights some techniques to stay motivated.

3. Find a support system

In life, we have family and friends. They guide is through new experiences and pick us up when we are down. Affiliate marketers need that same guidance and support, but from people that are operating in their industry; other affiliate marketers.

Action

Joining interactive training programs for affiliate marketers will act as a great support system.

4. Developing Weaknesses

A lot of people try, a lot of people fail, and a lot of people are successful.

When a sports team doesn’t come 1st, it’s because they are not the best. Think about it. They leave, they train, they adapt their strategy, and they try again.

One of the biggest challenges in not just affiliate marketing, but life too, is identifying and building on areas of weakness.

Usually it is a few weaknesses that lead to a huge decrease in happiness (in life) and money (in affiliate marketing). It’s the 80/20 rule and it can be applied to anything.

Action

If you’re make money online due to focusing on your strengths, that’s great!

If something is missing due to your weaknesses, allocate a small amount of time to develop them.

There are resources online for just about anything, whether that is learning HTML and design or even structuring content. Focus on developing one weakness at a time.

5. Choosing Your Niche

Choosing your niche in affiliate marketing is your first step to earning money from home. There are thousands of different niches, some more lucrative than others.

As you become a more seasoned marketer, it is likely you’ll develop multiple sites and campaigns. In the early days, it’s about getting a formula in place that works (which can then be replicated at a later stage).

Action

Be super-focused when it comes to what you are promoting; choose one product or niche. You can then learn how to gain credibility in that niche and your work will have impact.

Keyword research is not only an incredibly useful skill to have, it can be great to remove brain block when it comes to establishing the ways to make money online.

A good idea is to focus on niches that interest you. This is not a get rich quick scheme and you’re likely to poor hours of time (possibly some cash) into your ideas.

It makes sense that if you like camping; you focus on products and/or services that relate to camping to keep the day-to-day grind interesting!

6. Create A Budget

Approximately 82% of businesses fail, due to poor cash flow. A lot of these are actually turning a profit, but due to manufacturing lead times, late payments and more, they just run out of cash! Of course, people that look to earn money from home have no real overheads which will certainly help with budgeting.

Action

If your affiliate marketing idea is PPC reliant, creating the first month’s budget is fairly easy, as you’ll have bid estimates; what you can’t estimate is sales.

Ideally you’ll want to use a budget in stages as you creep your way up the learning curve. One bad PPC campaign could see a budget wiped out, so don’t be putting your whole affiliate marketing budget on the line at once!

All you are trying to do is establish a formula that offers positive ROI.  You are just trying to produce a set of data which will give you enough information to improve a campaign. Start small, find the formula, and then scale up.

7. Understand Marketing Avenues

There are 100s of marketing avenues that will help you to earn money from home, but without having an understanding of them; it’s going to be hard to make any cash at all. For affiliates, using a quality email platform and building lists is the #1 way to market products.

Action

Make it your goal to understand the basic principles of marketing via:

  • Email
  • Social Media Platforms
  • SEO
  • PPC
  • Content (our favourite!)
  • The list goes on!

8. Choosing Marketing Avenues

If this is your first time making money from home, you’ll be working alone for now! On a low budget and with no help a content marketing strategy for the web is usually the best way to go.

It’s a tall order to try and cover all aspects of marketing from day one; so don’t. In fact, some projects will produce a much better ROI by focusing on just 1 or 2 marketing avenues.

Action

Choose a marketing avenue that you feel comfortable with. Just remember, the competition is heavy so whatever you do it; make sure you do it better than “well”.

Let’s take content marketing as an example.

Open up the first 10 results for your search term and have a quick read. You need to be confident that you can develop a piece that offers the user more value, insight and pushes them to carry on reading than any of the other 10 results.

If you can’t, then it’s probably time to go back to the drawing board and develop a new content strategy

8. Campaign Planning, Monitoring & Refinement

Campaign planning, monitoring and refinement will help you figure out which campaigns are losing you cash and which ones would be making more with a larger investment.

Action

Find tools relevant to your marketing campaign. So, for content, you will benefit from these tools.

9. Don’t Oversell

When trying to develop a customer base through email, social media, blog posts and similar avenues, it can be tempting to constantly market products and/or services aggressively.

This doesn’t work. Consumers these days are bombarded with ads, schemes, brands and the brain just can’t cope.

Action

Nurture your visitors down a sales path that is new and exciting. Engage your user with interesting and relevant content first and sell to them later.

Assumption – You own a web design blog targeted at UK visitors and you want to promote a training course for beginners.

We could do a review of the course, but consumers are wise to the fact most reviews are actually sales pitches. Why try and deceive them anyway?

Take a more creative angle. Why is the individual looking at this course?

A good assumption is that they have an inclination web design could be a more lucrative job prospect than their current one.

So, ditch the review and connect with them; tell them the information that they want to know!

That would be things like they should expect a wage of around £32,000 and they shouldn’t have a problem finding a job, considering there are over 7,200 jobs on Indeed.co.uk in the UK.

Worried about becoming complacent? No problem! They could be the key component in a multi-million £  digital enterprise of the future!

Now that sounds something that is worth investing time into and there is no harm giving the course some exposure on that page!

Putting it all together

Now write a plan. There are 100s of marketers that make cash without a plan. It’s still worth writing. Not only is it something to refer to for a bit of a motivational boost, but it also helps you uncover your weaknesses.

Just because you are making money from home, doesn’t mean you shouldn’t be looking at this as a business; it is a business. By mapping out your online business idea, you’ll reduce your chance of failure considerably.

Action
Make a business plan using the guide here.

Writing a business plan will not only give you a blueprint to follow, it will really uncover how clued up you are about your business. You’ll instantly be able to see where the gaps are in your knowledge.


13 Social Media Tools For Businesses

13 Social Media Tools For Businesses 

You’re done writing a social media strategy. You’re probably pretty well-versed in Facebook, Twitter, LinkedIn and so on. Perhaps you’re exploring newer networks like Instagram and Pinterest too.

Well done, you. But the world of social media doesn’t stand still, and it can take all your time just to keep on top of all your communication channels. Here, then, are (a not at all unlucky) 13 social media tools you shouldn’t live without – all to help make your social media life just that little easier.

Hootsuite

Hootsuite

Hootsuite dashboard

Hootsuite is the go-to social media management platform for a lot of people and allows you to view all your Twitter, Facebook, LinkedIn or Google Plus posts on the same screen. So, for example, you might have a page set up showing your Twitter feed, sent Tweets and results for a hashtag you’re interested in, as well as the latest posts from your Facebook wall. There are some powerful analytics tools too – although these cost – letting you see your most popular links, follower growth and so on. A great addition to any SM strategy.

Twitonomy

Twitnomy

A Twitter-only tool – did you guess? – but one that’s incredibly useful. It shows you how many tweets you’ve sent over a specified period, how many people have retweeted you over the same time frame, which users retweet you most and the time of day people interact with your tweets most. There’s also a cool ‘mention map’, which drops icons onto a global map to show you where the people who interact with you live. Great stuff. Speaking of mentioning…

Mention

Like Google Alerts, but for social media. Ask Mention to alert you whenever someone mentions your brand on any social media site, and it’ll buzz you whenever it happens. A terrific monitoring tool.

Buffer

One of the best tools around for scheduling your Tweets, Facebook posts and LinkedIn updates.  It’s easy and straightforward to write different posts for different sites ahead of time, and schedule them for any point within the next seven days.

Know Em

Know em

There are so many social media sites you might want to use, and it’s important to keep your brand name the same across them all to avoid confusion. For instance, a fishing supply company might want /topfishingtackle as the suffix to their addresses across Pinterest, Facebook, Twitter, Vimeo, WordPress and so on. Using Know Em means you don’t have to go to each individual site to check the availability of your proposed username – instead, you can just enter it into Know Em and it’ll search them all to tell you whether or not it’s already been taken on each.

Google Analytics

You probably know all about how useful Google Analytics can be for keeping tracks of users and clicks on your website, but it’s equally handy for doing the same on your blog page. You’ll soon know which posts get the most interest, and where from. Likewise, you can also now track social traffic in Analytics, supporting the popular theory that Google is indeed starting to give social more weight and it’s now one of the most SMM tools available for free.

Tweriod

Knowing exactly when your followers are most likely to be online is super-useful, because it means that you can time your Tweets for when they’re most likely to be seen and interacted with. Tweriod can tell you exactly that, and lets you export that data to Excel or as a PDF.

Storify

Storify allows you to take a bunch of Tweets on any topic, sorted by hashtag, and turns them into a lovely looking, easy to digest, chart – including images and videos – which can then be shared elsewhere on the net (they look great on Pinterest). It lets you, for instance, see the full story of that important conference as it unfolded – what happened, what were people saying, did you get the results you needed from the event? It’s fantastic for seeing just what people think of your products or services.

JQuery Pin It

We mentioned Pinterest just then – it’s one of the fastest-growing social networks around. It works by placing a ‘Pin It’ button on your toolbar for you to click whenever you see a page with a great image on it. JQuery, however, allows you to pin an image simply by hovering your mouse cursor over it – making the whole process that tiny, but essential, bit quicker. Vital if Pinterest is central to your social media strategy.

PicMonkey

Facebook’s fantastic, but it’s easy to overlook any captions beneath images if you’re flipping quickly between shots. PicMonkey allows you to quickly and easily add copy onto pictures before posting, without any awkward messing about in PhotoShop.

Tagboard

Now that hashtags have transcended Twitter and moved on Facebook and Google Plus, you need a tool that lets you search for hashtags across multiple social media. Enter Tagboard, which does… well, exactly that. Find out if that topic you’re interested in is being discussed across multiple media by searching for its hashtag on Tagboard.

Brook

Brook

Who influences your audience? Whoever it is, it’s sensible to take an interest in their interests – and that’s what Brook is handy for. It lets you set up a list of key influencers, and sends you an email each day summarising the most popular tweets they’ve sent. And that means you can tailor your tweets to them, and there’s more chance of them promoting your content to your target audience.

Leadplayer

Those of you who use YouTube or Daily Motion a lot should be using Leadplayer.  It’s a very quick and easy tool that lets you slap a call to action onto your videos before you upload them – for instance, you could ask people to enter their email address to subscribe to your newsletter, or simply insert a ‘visit our website here’ message. Sorted.

That’s 13 social media tools to really boost your online effort – play around with them and see what works for you. But that’s just the tip of the iceberg – a Google search will reveal stacks of other toys to try, and new ones launch endlessly.

Social media never stands still, so you can’t afford to either.